
Hi vAdmins and vArchitects,
As promised in my previous architecture update, where we discussed why License Hub 2.0 is now a mandatory prerequisite for vDefend 9.1 and Avi Load Balancer 32.1.1 in VMware Cloud Foundation (VCF) 9.1, it is time to roll up our sleeves!
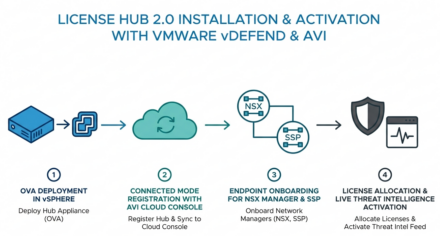
Moving from legacy 25-character serial keys to signed subscription files (.lic) and centralizing entitlement management across up to 120 endpoints is a major evolution for multi-site lifecycle management. In this hands-on walkthrough, we will cover the step-by-step workflow to deploy the License Hub appliance, bind it to the cloud portal in Connected Mode, onboard target endpoints, and activate live security services.

Phase 1: Deploying the License Hub Appliance OVA
Broadcom has delivered a streamlined, compact appliance footprint capable of managing up to 120 downstream endpoints.
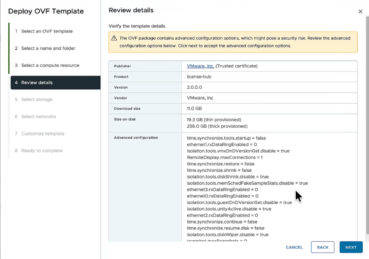
Resource Requirements
Before launching the OVF Deployment Wizard in the vSphere Client, ensure your management compute cluster and datastore meet these baseline specifications:
- vCPU: 6 vCPUs
- RAM: 12 GB RAM
- Storage: 256 GB minimum datastore allocation
Deployment Parameters
- Network Mapping: Map the network interface to your management VLAN.
- System Credentials: Set appliance passwords for the root, sysadmin, admin, and audit accounts.
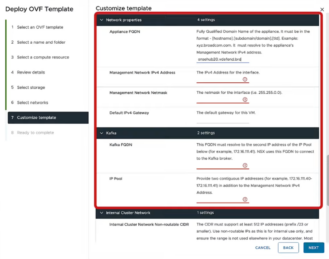
- Appliance Network Identity: Assign the FQDN, management IPv4 address, netmask, and default gateway.
- Kafka Configuration: Input your Kafka FQDN and an IP pool containing two consecutive static IP addresses.
- Pro tip: Pay close attention here—Kafka strictly maps and binds to the second IP address in this static pool!
- Cluster & Operational Settings: Define the internal non-routable cluster network subnet, DNS servers, search domain, NTP servers, and toggle SSH access.
Review the configuration summary and deploy. Once the appliance boots up, access the local License Hub web interface.
Phase 2: Registering in Connected Mode & Syncing Entitlements
License Hub 2.0 supports connected, disconnected, and private operating modes. Connected Mode is strongly recommended as it handles automated 24-hour usage reporting to Broadcom and eliminates manual file transfers.
Cloud Registration Workflow
- Local Authentication: Log into the local License Hub UI with your Broadcom credentials and select your Customer Site ID.
- Copy Instance ID: Navigate to Registration and Reporting and copy the generated License Hub Instance ID.
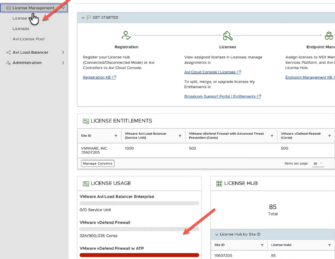
- Broadcom Portal Binding: Open the Avi Cloud Console in a new tab at portal.pulse.broadcom.com and go to License Management > License.
- Pro tip: Key upgrades in the Broadcom Support Portal are non-reversible! If you operate mixed-version environments, make sure to split your license keys in the portal before converting them to the new subscription format.
- Attach SKUs: Locate your available core SKUs—such as VMware vDefend Firewall with Advanced Threat Prevention (ANSFWATP)—click Add to a License Hub, and paste your copied License Hub Instance ID.
- Synchronize: Return to your local License Hub UI under the Licenses tab and click Refresh.
The signed subscription file syncs immediately. Navigate to Registration and Reporting to verify that your appliance status transitions from Unlicensed to Licensed and matches your Customer Site ID.
Phase 3: Endpoint Onboarding & Core Capacity Allocation
With the appliance licensed, navigate to Endpoint Management to register your target control planes.
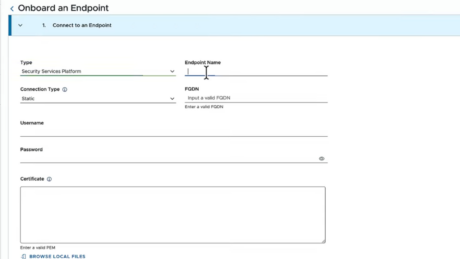
Onboarding Endpoints
- NSX Manager: Click Onboard an Endpoint, select NSX Manager (e.g., NSXM 9.1 site x), choose Dynamic connection type, and enter the NSX VIP IP address, admin credentials, and CA certificate.
- Security Services Platform (SSP): Click Onboard an Endpoint, select Security Services Platform (e.g., SSP5x small), choose Static connection type, and supply its FQDN, admin credentials, and CA certificate.
Allocating Core Capacity
- Verify both endpoints display a Ready status.
- Open the action menu for NSX Manager and click Edit License Assignment.
- Assign your allocated core capacity from the vDefend Firewall with ATP key and save.
- Allow a few minutes for the assignment to propagate across the endpoints.
Phase 4: Operational Verification & Feature Activation
To verify end-to-end functionality, check that your downstream control planes have received their entitlements and can pull live threat feeds.
Verifying NSX Manager & Threat Intelligence
- Log into NSX Manager and navigate to System > Licenses to confirm the active VMware vDefend Firewall with Advanced Threat Prevention entitlement.
- Navigate to Security > IDS/IPS and Malware Prevention > Signature Management and toggle Automatic Updates.
- With an active entitlement, NSX Manager successfully contacts the VMware Threat Intelligence Cloud and downloads the latest threat signatures.
Verifying Security Services Platform (SSP) & Security Intelligence
- Log into the SSP UI, navigate to System > Licenses, and click Refresh to pull the synchronized entitlement.
- Go to Platform and Features and click Activate on the Security Intelligence card.
- The system executes an automated pre-check wizard validating NSX Manager integration, license compliance, and Kubernetes cluster health.
- Once the progress bar reaches 100%, real-time streaming of network metrics and security telemetry across your infrastructure begins.
Finally, you can return to the Avi Cloud Console and click on License Hub Details to view real-time usage reporting and allocation metrics.
Final thoughts
License Hub 2.0 simplifies Multi-Site licensing across VMware Cloud Foundation 9.1. With built-in backup and restore support, RBAC integration, and API automation readiness, it keeps your vDefend and Avi security estate Compliant and ready to scale.
Stay tuned, and as always, happy Private Cloud Building!
End of this post.
Disclaimer: Please note that the views expressed in this blog are solely my own and should be treated as personal opinions. This content does not hold any legal or authoritative standing.